The highlight of my 10-day no-car Norway hiking trip was an epic Trolltunga overnight hike. Trolltunga is a popular hike in Norway, and the overnight version extends the experience for an unforgettable adventure. Norway is a fantastic hiking destination and was one of my favorite hiking vacations to date. You can get my full itinerary which covers 5 hikes in 10 days all via public transit in my overview post.
I did the Sunset/Sunrise Trolltunga overnight hike with Trolltunga Active, one of the major tour operators for the hike. It was the highlight of my trip and the hike that I planned much of the itinerary around, so it deserves its own deep-dive post. If you’re an overplanner like me when it comes to splurges, I’ll walk through every piece of my experience. By the end of this review, you’ll be as prepped as can be before you book.
Note: This is my independent review of my experience with Trolltunga Active in Spring 2023. My experience was not paid for and this review is not sponsored or compensated. I’m always looking for in-depth reviews of pricier experiences before I book so that I know what I’m getting myself into, so wanted to help out those who feel the same!
What is the Trolltunga hike?
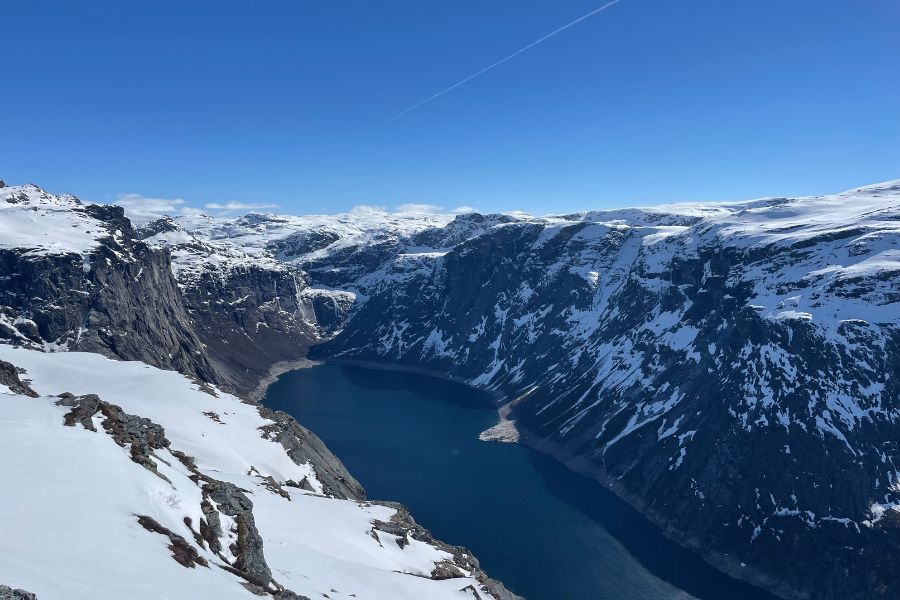
The Trolltunga hike is a recently popularized hike made instagram-famous by its stunning photo op. When conditions are right, hikers can venture out onto a small “tongue” of rock jutting out over an expansive gorge. While this may create a stomach-churning “don’t-look-down” moment for some, the composition and scenery are incredible.
Beyond the “troll tongue” itself, the ~16 mile round-trip hike offers continuous stunning views over the mountainous landscape. The first 4 miles of the hike contain most of hike’s 4000-foot elevation gain. Once you make it through the initial ascent, the hike levels out until you reach the titular destination. The return hike is speedier as you descend what you climbed earlier.
The nearest major town to the Trolltunga hike is Odda. Odda is an industrial village which has become increasingly touristic as the popularity of Trolltunga has exploded. Odda is accessible by car or bus, and has a number of hotels to accommodate eager hikers.
The Trolltunga hike is accessible year-round. However, during the long winter, the trail is very snowy and requires significantly more preparation than during the touristic summer months. During the winter, the higher parking lots are closed, making the round-trip hike significantly longer. In addition, the “troll tongue” photo op often cannot be accessed due to dangerous ice and snow.
Hikers can tackle Trolltunga independently or as part of a guided group. Most people day hike Trolltunga, but overnight camping is permitted. In addition, several companies offer guided Trolltunga overnight hikes, which are the focus of this review. Regardless of how you want to hike Trolltunga, the official website is full of info to help you plan.
How does the Trolltunga trailhead work?
The Trolltunga trailhead is accessible from a series of three trailheads, each increasingly closer to the actual “trail”. As you ascend the parking lots, there will be various parking and toll fees. The lower you stay, the cheaper your parking. The Trolltunga website has great parking details, but in short:
- P1 Tyssedal: Lower parking lot, 38 km and 2000 m of climbing round-trip
- P2 Skjeggedal: Main parking lot, 27 km and 1200 m of climbing round trip
- P3 Mågelitopp: Upper (extremely limited) parking lot, 20 km and 800 m of climbing round trip
The Trolltunga Winter/Shoulder Season Experience
I did my Trolltunga overnight hike in the first week of May, which is “shoulder season” for Southern Norway. This means that while it’s not deep in the winter off-season, it’s also not quite peak tourist season yet. For me, off-season travel means fewer crowds and sometimes cheaper prices, which I love. However, it can also mean less predictable weather and tourist amenities.
Both the pros and cons of shoulder season came into play heavily for my early May Trolltunga overnight hike.
Pros to hiking Trolltunga during winter/shoulder season
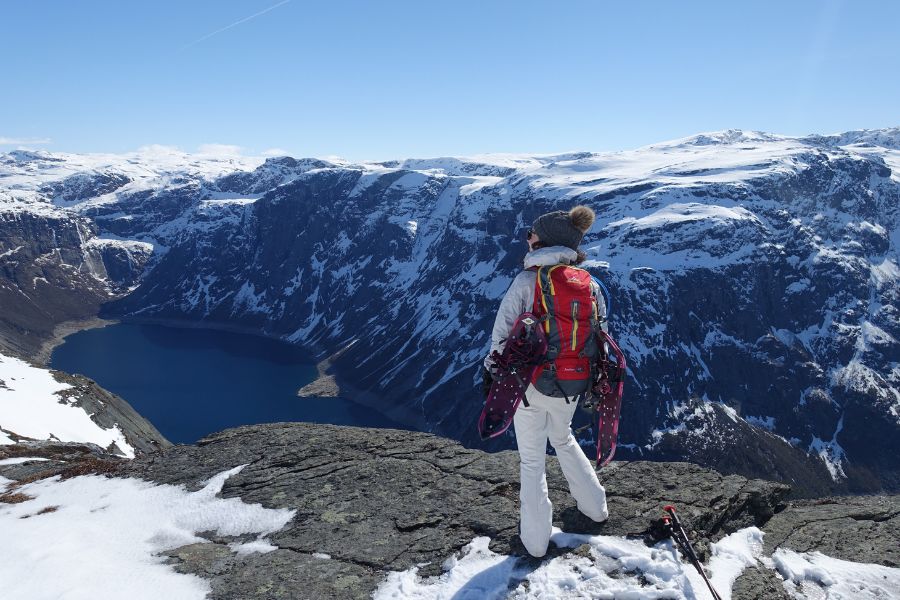
- No crowds. Because of my combination choice of off-season and overnight hike, I got to spend the night up on the mountains of Trolltunga as the only group up there. It was simply magical. Even on the hikes in and out, we only encountered a few other groups, and had the trail mostly to our own. My guide told me that during the summer, the trail is packed. This means that there are often hour-plus lines to take the iconic Trolltunga photo. In comparison, we didn’t see a single other person at the troll tongue.
- Dramatic scenery. My Trolltunga overnight hike was very snowy, and I found the snow-covered landscape to be an incredible backdrop for the hike. When I compare my photos to those taken during the summer months, I can’t help but feel like the mountains just look a little bit taller and more imposing when they’re covered in snow. I loved my snowy vistas, and it absolutely added to the experience for me.
Cons to hiking Trolltunga during winter/shoulder season
- More challenging hiking conditions. Given the completely snowy nature of the hike, I had to carry both snowshoes and microspikes with me at all times. I used them both as needed based on the conditions. Both of these tools make snowy hiking possible, but also require significantly more energy to hike with versus plain hiking boots. For an already long hike, this is important to consider.
- Photo Op Accessibility. On my hike we were not able to access the titular troll tongue for the traditional photos. During the winter, snow and ice cover the “access area”, creating treacherous conditions. The company and guides were very upfront about this so it was not a surprise when the conditions were not in our favor. For me, the rest of the scenery and experience made this hike more than worth it. However, if you’re in it specifically for the picture, shoulder season is not for you.
- Trailhead accessibility. During peak season, shuttles run from Odda to the trailhead, and from lower parking lots to upper parking lots. During off season (when I was there), there were no shuttles from town, and no parking lot shuttles. Transportation was a huge part of the reason why I started looking into guided options in the first place. Companies not only offer transportation from Odda to the trail, but also as high up in the parking lots as possible. We made it somewhere between P2 and P3 in an all-terrain vehicle driven by the tour company. In comparison, the folks who we met without a guide had to park at P1. This added a huge amount of milage and elevation to their hike.
Why did I pick a guided trip with Trolltunga Active?
Why do Trolltunga with a guide?
As soon as I started researching the logistics of a winter/shoulder season Trolltunga trip, I realized I’d probably want to choose a guided experience. This was for two main reasons:
Transportation to Trolltunga
I did this hike as part of my no-car Norway Itinerary. The entire itinerary revolved around public transporation, so I wasn’t going to be driving myself to the trailhead. During shoulder season, there are no shuttles to and from the trailhead, so I couldn’t rely on that.
Even if I’d decided to break the no-car structure just for this hike, I may have come up empty. I met one guy on a guided Trolltunga day hike who had planned to rent a car in Odda and hike Trolltunga solo. However, he arrived in Odda only to discover that there were no cars available. He swiftly joined a guided hike to ensure he had a way to get to and from the trailhead.
Finally, even if I had managed to rent a car, cars often cannot go all of the way to the top parking lots. During off-season there are no shuttles between parking lots. This means if you get stuck at a lower lot, you’ll have a much longer, steeper hike ahead of you. By contrast, Trolltunga Active got us as close to the top of the road as possible given the conditions. They leveraged a combination of parking lot permits and all-terrain vehicles that we switched into once the roads got too snowy.
Solo hiking Trolltunga with less familiar gear & conditions
This hike was part of a solo trip, so every hike that I went on became a solo hike by default. On shorter, more accessible hikes I was more comfortable solo hiking as I could easily extract myself if I was feeling in over my head. However, Trolltunga pushed my comfort zone in terms of solo hiking for two reasons: length and terrain/gear. 28 kilometers from P2 is no joke, and I was concerned about what would happen if I made it far into the hike and something were to happen.
Second, and more practically, I did not have either snowshoes or real microspikes with me (thanks carry-on luggage). I was also not particularly experienced at hiking in snowshoes. Even if I was able to find local gear rentals, I knew that I would not be able to complete a long hike in snow shoes with no guidance.
Why choose Trolltunga Active?
Once I determined that I wanted to do a guided hike, I started doing my research and came across two main companies: Trolltunga Active and Trolltunga Adventures. If I had been looking for a guided day hike, I’m not sure what would have separated the two companies. Both have great websites and glowing reviews, and pricing is fairly similar.
Trolltunga overnight hike winter offerings
However, as soon as I stumbled upon the listing for the Winter Sunrise/Sunset Overnight hike on the Trolltunga Active website, I was hooked. I loved the added time and special experience in the Norwegian wilderness that the overnight version offered. I also liked the idea of splitting the hike over two days given the trip context. This hike was part of a 10-day hiking itinerary, and I was concerned that after the marathon round trip, I’d be more likely to be injured or too tired for subsequent hikes.
Trolltunga Adventures offers winter day hikes but doesn’t offer winter Trolltunga overnight hikes. So if I wanted the overnight experience, Trolltunga Active was the way to go. Let me be clear: I am sure that both companies are fantastic. Trolltunga Active just fit my needs and I happened to have a fantastic time, so that is what I am speaking to here.
Trolltunga accommodation logistics
There was one additional key factor which made Trolltunga Active a great choice for me: easy accommodation logistics. Trolltunga Active is affiliated with Trolltunga Hotel, which is where I stayed in Odda before the hike. I was immediately drawn to Trolltunga Hotel given its reasonable pricing compared to other accommodations in town.
In addition, its affiliation with Trolltunga Active was highly advantageous. The hotel offered free transport to the Trolltunga Active base the morning of the hike, which was key. Plus, I could easily attend the pre-hike info session at the hotel, and store my bags at the hotel for the night when I was on the hike. This partnership made the logistics significantly easier for me as a solo hiker with no car. Thus, it became a major deciding factor in terms of tour company.
How much did the Trolltunga overnight hike cost?
As of the time of writing, the winter Trolltunga overnight hike with Trolltunga Active comes in at 4600 NOK, or about $470. As someone who usually stays in hostels and takes night busses to save money, this was the most expensive thing (other than plane tickets) that I’d ever bought on a trip. However, I wanted to gift myself a bucket-list-worthy experience on this trip as a personal “bonus” for making it through a year and a half in a very high-intensity corporate job. When I stumbled upon this experience, it felt perfect.
In addition, a smaller piece of my brain immediately started doing the rationalization math given the high costs of Norway. If a night in a hotel was going to cost me well over $100 anyway and all of my transportation plus some meals were covered, those could surely be discounted from the “cost”, right??
What does the Trolltunga overnight hike price include?
When you book the Trolltunga overnight hike with Trolltunga Active, you get:
- Pre-trip briefing the night before
- Transportation to and from the trailhead before and after the hike, including all-terrain vehicle support to get as close to the trailhead as possible
- A snack, dinner, and breakfast, plus hot drinks in the dome (you bring your own lunches)
- A sleeping bag, liner, and padded sleeping area
- An overnight stay in an impressively equipped glamping dome
- Extra warm gear in the glamping dome
- Snowshoes, snow spikes, and hiking poles as needed
- A lovely guide who makes the experience truly luxe, providing information and stories, while carrying all group gear (you’re only responsible for your personal clothes, food, and snow gear) and doing all of the cooking and set up work.
In addition, Trolltunga Active offers gear rental of rain jackets/pants, hiking boots, and 40L backpacks if you don’t have them. I rented a backpack as the rest of my hikes on this trip were day hikes and my day pack wasn’t large enough for the Trolltunga overnight hike. It was a basic but functional pack, and I was grateful for the option to rent.
What was the Trolltunga overnight hike experience like?
Preparing for the Trolltunga overnight hike
The Trolltunga Active overnight hike experience started the night before the hike, when a senior guide led a briefing at the Trolltunga Hotel. At this briefing, they addressed the next day’s overnight and day hiking groups. I had the opportunity to meet other hikers, and get info on weather and conditions so that I could tailor my packing. It a great chance to ask any outstanding questions and make sure you’re fully prepared for the hike.
The morning of the hike, the overnight group gets to have a much more leisurely departure than the day hikers, who leave at the crack of dawn. Staff drove me from Trolltunga Hotel to the Trolltunga Active Base at the P2 Skjeggedal parking area. If you have a car and are staying elsewhere, you can also meet the group directly at Skjeggedal.
From the Trolltunga Active base to the trailhead
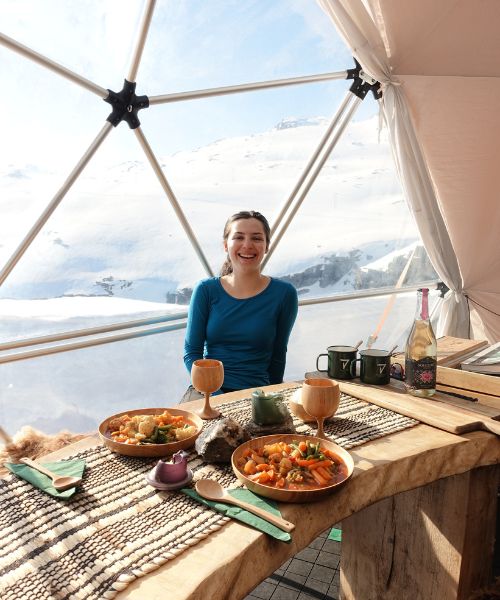
At the base, I met my guide and picked up my rented backpack. I repacked into the larger backpack, stashing any extra supplies I wasn’t bringing with me at the base. At base, I was also able to choose my dinner for the night. I got to choose between a vegetarian option and several meet options, and I went with veggie. Each dinner option was a frozen stew prepared by the Trolltunga Hotel chef. The meals were well-packed in plastic bags for easy carrying and cooking. Each hiker was responsible for carrying their dinner meal up to the overnight domes.
At this point, the guide then drove us past P2 until the road began to get snowy. At the start of the snow, Trolltunga Active had all-terrain vehicles parked and waiting for us. This allowed our guide to ferry us up a few more steep switchbacks before the road got too dicy.
Hiking to the overnight domes
Once we’d driven as far as we could go, it was time to start hiking. The first leg of the hike was up steep switchbacks, following the road under the snow. Once we reached the official trailhead, the slope softened a bit as we wound our way gently uphill. The real “test” of the hike comes right around mile 3 if you’re hiking from P2. You’ll encounter a brutally steep wall of snow with about a half mile where the grade is solidly above 25%, and often above 30%.
Once you make it to mile 4, most of your hard-core cardio is over. By the time you crest the hill, you’re greeted by stunning vistas that continue to evolve throughout the hike. It was one of the most consistently incredible offerings of views that I’ve experienced on a hike, and it kept me entertained the entire time.
In addition to the views, my guide as instrumental in ensuring a fantastic experience over the two days. She did a great job of managing safety/technical aspects of the hike while seamlessly creating a fun, luxurious experience. We got along great, and by the end it felt like I was on a hike with a good friend rather than a guide.
Around mile 5 we stopped for lunch in a small “emergency hut” before continuing our trek to the overnight domes. The domes sit just under a mile from Trolltunga, tucked away in a secluded area off the main trail.
Settling in at the glamping domes
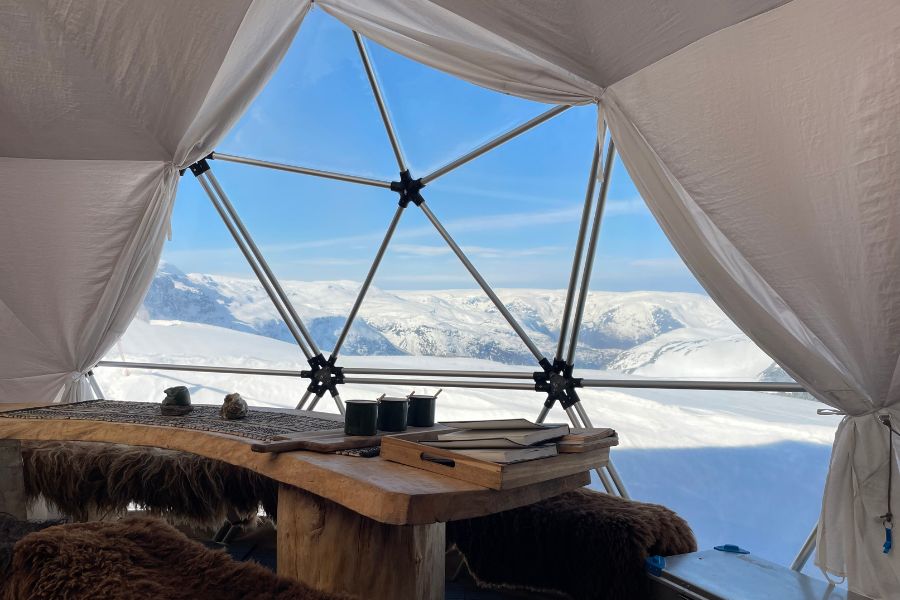
I’d been all smiles for the full hike, but checking out the dome for the first time elevated the hike to a whole new level. I love backpacking, so I’m used to basic wilderness accommodations. While I had swooned at the website pictures, I wasn’t ready for the absolute luxury of this glamping experience.
The dome was absolutely gorgeous, and perfectly embodied a cozy Norwegian escape from the elements. The dome contained cozy sleeping bags and extra warm clothing to protect against the cold. The beautiful wooden dining table and small stove in the corner made it feel like we were in a luxury cabin rather than a glamping dome! The bathroom facilities were simple but comfortable – a composting pit toilet stands a short walk from the dome.
Upon arriving at the dome, we had plenty of time to relax while the guide prepped the dome. After a bit of R&R in the dome, our guide cooked us dinner. I generally have low expectations for camping/backpacking food, but I was pleasantly surprised. The veggie stew and rice was one of the tastiest meals I had in Norway, and certainly had the best ambiance. The guide also surprised us with a bottle of Norwegian apple cider which she had carried from base. This added another luxurious touch to the meal, amping up the glamping vibes.
The final push to Trolltunga
After dinner, we suited back up in our warmest clothes, laced our hiking boots, and headed back out into the snow for our sunset trek to Trolltunga. Because of the sunset hour and the off-season timing, we were the only ones out. This meant that we were lucky enough to have the entire landscape to ourselves. The hike from the domes to Trolltunga was flat and easy, and soon enough I was feasting my eyes on the incredible views that inspired me to plan the hike in the first place.
As I mentioned above, given the snow conditions in off season, we were not able to access the actual troll tongue for the classic picture. However, our guide had prepped our expectations well, and the viewpoint was still more than spectacular even without that specific photo. The guide was more than happy to take plenty of photos, and even brought a Trolltunga Adventures camera to take candid pictures along the way throughout the hike.

We spent over an hour at the viewpoint completely alone in the Norwegian wilderness as the wind whipped and the light faded. It was an absolutely surreal experience which confirmed for me, for the umpteenth time, that the Trolltunga overnight hike was a great choice.
Spending the night in the domes
Once we started to get chilly and the sun had set, we headed back to the domes for the night. Our guide made hot drinks and offered us a delectable selection of gourmet Norwegian snacks to cap off the night. Then, it was time for bed. I was grateful for the massive sleeping bags and extra clothing in the dome as temperatures did get quite chilly overnight. Earplugs were also a must given the whipping wind – I brought my own, but they also had some on offer for anyone who forgot!
Day 2: Returning from the Trolltunga overnight hike
The next morning, our guide made us hot drinks and set out a simple breakfast. Before I knew it, we were packing up to head out. The hike out was quick and beautiful. Throughout both days of hiking, we switched between snow shoes, spikes, and plain hiking boots depending on conditions. Early in the day or later at night when conditions were colder, spikes helped to grip the icy snow, whereas at midday, snowshoes and regular boots were better suited for slushier, softer snow.
Once we made it back down to the all-terrain vehicles, the guide ferried us back down to the base, where we dropped off rented or borrowed gear and picked up any belongings we had left. Here, hikers had the opportunity to purchase any souvenirs or gifts they wanted. While we were there, our guide uploaded the photos from the company camera and shared photo links with us. The photos that out guide took were fantastic, and a great way to remember the hike. Finally, the guides transported those of us without cars back to the hotel.
Is the Trolltunga overnight hike worth it?
If you can’t tell from my description above, YES, my Trolltunga overnight hike with Trolltunga Active was 100% worth the price and time commitment. It was by far the highlight of the trip, and one of my favorite hiking experiences of my life so far. The scenery was drop-dead gorgeous, but it was all of the special touches by Trolltunga Active which transformed it from just a hike into a truly memorable experience. I cannot recommend it enough if you have the budget and the time to spend a night up at Trolltunga!