When I was prepping for my move to Côte d’Ivoire, I realized that I’d have to figure out how to keep my phone number for the move abroad. Not only is it enmeshed in years of contacts, but these days all of my important accounts require two-factor authentication via texts. The last thing I needed was for my bank to shut me out abroad because I wasn’t answering their texts. My move was too long to pay exorbitant international fees on my existing plan, but not permanent enough for me to abandon the number altogether. So what’s a girl to do?
After quite a bit of very confusing research, I eventually picked my strategy. I transferred my number and service to GoogleFi via an eSIM, and grabbed a local SIM for data once I settled in abroad. I was a bit nervous as it was hard to find testimonies of others who had done this, but it ended up working perfectly.
If all of that sounds a little opaque, no worries. If you’re also looking to keep your phone number for a move abroad, I’ll walk you through what I did, step by step. I have an iPhone, so my instructions and screenshots will be iPhone-centric. If you have a different model of phone, a bit of extra googling should get you there. I’ll also offer two other options that some of my friends have chosen: Google Voice and international plans, as everyone’s priorities are a bit different.
Checking your Phone’s Compatibility
One very important disclaimer before we go any further: the solutions below require your phone to have two important characteristics. It must be 1) unlocked, and 2) dual SIM compatible.
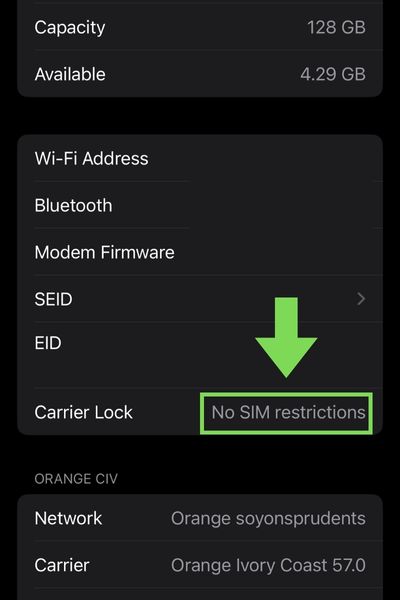
Check whether your iPhone is locked or not by going to Settings –> General –> About. Scroll to “Carrier Lock”, and look for “No SIM Restrictions”. If you don’t see that language, your phone is likely locked. For other phone models, Google “how to tell if my [phone model] is locked” to find instructions on checking the status. To check whether your phone has dual SIM capabilities, google is your best bet again. Search “Does a [phone model] have dual SIM capabilities” and go from there, as every phone make is different.
What’s the deal with an unlocked phone, you may ask? Americans tend to buy phones locked to providers. This lowers the upfront cost, but can make it a headache to switch carriers. In turn, this can make it nearly impossible to utilize dual SIM capabilities while traveling. I LOVE having an unlocked phone as it also enables me to efficiently use eSIMs for shorter trips (I’ll put together a guide on how I use eSIMs soon), and use local SIMs for longer trips/moves abroad. If your phone is currently locked, you’ll have to chat with your carrier to find the best solution. Different carriers have different policies around unlocking, so success will vary by carrier.
As I mentioned above, I went with Google Fi + a local SIM, and it has worked great. Below, I’ll lay out how this works and how to do it yourself. I’ll also describe two other options: Google Voice, and your existing carrier’s international plan.
GoogleFi: Balance Budget and Functionality to Keep your Number Abroad
Step 1: Choose your Google Fi Plan
GoogleFi has two main plans which I utilized in my number switch:
- Google Fi flexible plan: For $20/month this plan gives you free calling and texting to other US, Mexico, or Canada numbers, and offers a fee structure for calls to international numbers. International data is pay-as-you-go, at $10/gigabyte.
- Google Fi Unlimited plan: For $65/month, you get everything the flexible plan gives you, plus unlimited international data and a few other perks (YouTube premium, google storage, etc.).
I started with the Unlimited plan as I didn’t want to stress about data in my first month abroad. I then switched to the flexible plan once I had transferred over to a local SIM. In retrospect, I probably could have started with the flexible plan in the first place. Luckily, Google Fi makes it super easy to switch online if you so choose. If you want to get $20 off your phone bill, you can use my link to sign up for Google Fi, and I’ll get a few dollars off my next bill as well!
Step 2: Switch Your Number to Google Fi While in the US
While I was still in the US, I switched from Verizon to Google Fi Unlimited, a relatively painless process. Once you sign up for Google Fi, they walk you through the process step-by-step, so I won’t outline it here. I opted for the eSIM version of their SIM rather than a physical SIM. This allowed me to do the whole process online, and kept my physical SIM slot open for a local SIM.
My phone is dual-SIM, so I can have two active SIMs at once. However, I am limited to one physical and one eSIM. I can’t have two physical SIMs or two eSIMs active at once. If you’ve done your research on local carriers and know that you want to get an eSIM from a local carrier when you arrive, then you’d want to get a physical GoogleFi SIM. Either way, aim for one physical SIM, and one eSIM if that’s what your phone allows.
Step 3: Acquire & Set Up a Local SIM Card
Once I arrived in Cote d’Ivoire and got my bearings, I decided to get a SIM with Orange, the largest phone provider in the country. I went to a local Orange agency and bought a SIM card that I could load with data-only packages. Through Orange, I can get 7.2 gigabytes of data for ~$8 – much cheaper than Google Fi data.
Once you have your local SIM, make sure you give it a helpful label and turn it on.
- On an iPhone, you’ll go to Settings –> Cellular and click on your new SIM from the list of SIMs. Click on “Cellular Plan Label” to choose the label. I like to make a custom label, usually the network and country name, to make Step 4 easier.
- Next, make sure your new SIM is on. Once again, from Settings –> Cellular click the new SIM, and make sure that “Turn on This Line” is toggled on. Also, make sure that “Data Roaming” is toggled on.
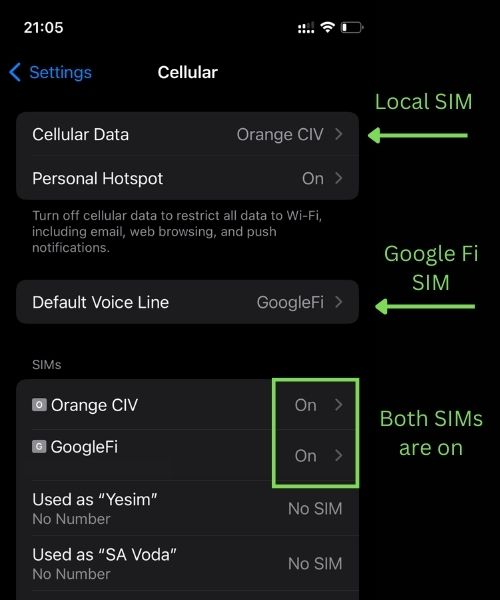
Step 4: Adjust Your Settings for Dual SIM
Once you’ve activated your local SIM, it’s time to adjust your phone settings to support both SIMs seamlessly. On an iPhone, you’ll want to go to Settings –> Cellular. Under “Cellular Data”, select your new local SIM. Under “Default Voice Line”, select your Google Fi SIM. This will ensure that your phone uses your American number as the default for calls and texts, but uses your local SIM as the default for cellular data. You’re now good to go with your dual SIM setup!
Key Things to Know about Google Fi Before You Switch
- You need to switch your line to Google Fi and activate the plan while you’re still in the US. Make sure you give yourself about a week of buffer to ensure that everything is running properly before you move.
- Google Fi data is NOT meant to be used internationally long-term. They will shut down your data after 3 months of international use unless you go back to the US for a week or so. As such, this is only a sustainable long-term solution when you pair it with a local SIM for data, as described above.
- Note: they won’t shut down your whole plan after 3 months. Calls and texts on your US number will be just fine, they’ll only turn off your Google Fi data.
- With Google Fi, almost everything about calling and texting works as usual on my iPhone. However, voicemails work slightly differently. Instead of receiving voicemails through the phone app, I receive them through the GoogleFi app which I’ve downloaded. I found this to be an easy adjustment and not much of a disruption compared to other solutions out there.
Google Voice: The Budget Option for those Willing to Sacrifice a bit of Functionality
Many folks who are abroad long-term swear by porting their phones to Google Voice. You pay a one-time $20 fee to port your number from your current carrier to Google Voice, and your number is safely preserved until you decide to transfer back to a US-based carrier. Google Voice isn’t a phone plan, so you’ll need to get a local phone/data plan at your destination. In addition, having your US number on Google Voice changes the way that you interact with your number somewhat. Calls and texts are reliant on having a wifi/data connection, and are routed through the Google Voice app rather than the native calling/texting apps on your phone (though for iPhone, you can still receive iMessages through the messages app).
I haven’t done this myself, but if you’re looking for a cheap solution and aren’t worried about a more hands-on approach to using your US phone number, it can be a great option. Check out Lori of aBroad Purpose’s detailed post on porting to Google Voice if you want to learn more.
Your Provider’s International Plan: The Hands-Off, Higher-Budget Option to Keep your Number Abroad
If you’re willing to spend a bit to avoid international SIM-switching, it may be worth looking into your current provider’s monthly international options. For example, Verizon offers a monthly international plan with unlimited international data at $100/month, and T-mobile offers several plans (namely the Go5G Next at $100/month) and the Go5G Plus at $90/month) with 5 GB of high-speed international data and unlimited slower international data per month. This isn’t cheap for individual users, but don’t write it off until you’ve checked the details of your current deal. One of my friends was on a family plan with T-Mobile which made the international plan MUCH cheaper. If you’re on a group plan, it’s worth checking the cost for you to get on a plan with international data. And even at $100/month, it’s still much cheaper than the daily rates that some carriers charge (upwards of $10/day).
Trying to figure out how to keep your phone number when moving abroad can feel like an expensive hassle. Luckily, there are a few solid options out there depending on your budget and your tech savviness. Once you pick a path, you’ll make sure that you still get those fraud-prevention texts (or texts from your ex) without breaking the bank.
Pingback: Moving to Abidjan, Côte d’Ivoire (Ivory Coast): A Guide - Window Seat Wanderlust