I stumbled upon my Norway hiking trip while looking for somewhere I could plan a solo hiking trip that revolved around public transportation. I love hiking while traveling but I don’t love driving, and renting cars while solo traveling can get expensive fast. Unfortunately, it can be tough to plan hiking-focused itineraries that don’t require a car. Often, the overlap between public transit accessibility and nature/trailheads/hiking is quite small.
Luckily, the fjords of Southern Norway present a fantastic opportunity to do some stunning hiking with no car needed! If you’re looking for a low-planning option for car-free Norway travel, check out the company Norway in a Nutshell (NiN). NiN will help you book coordinated packages of ferries, trains, and buses to suit your trip duration and planned destinations. They have a variety of packages that range in length, destination, and price, so if your itinerary is flexible, this can be an easy way to book.
However, after charting the hikes that I was interested in extensively via Google Maps, I decided to DIY my itinerary. While NiN would have made the planning easier, I had some hikes on my list that were slightly off the beaten path and couldn’t be reached easily via NiN’s packages. After much planning with the help of my trusty companions Google Maps and Rome2Rio, I landed on a circular route. I started in Bergen, then traveled to Balestrand, Flam, and Odda before heading back to Bergen. While this route required more planning on my end, it let me center the trip around hiking.
A few things to know about this Norway hiking trip before we set off:
Shoulder Season in Norway
Shoulder season is the period just before or after peak season for a destination. I traveled to Norway in late April/early May, which is very much shoulder season for the Southern Fjords. This meant that prices were lower and there were fewer crowds (yay!) but also meant that the weather was more unpredictable. Norway hiking in the spring can mean quite a bit of snow. Some of the hikes on my wish list were inaccessible or had to be planned differently due to snow. In addition, some restaurants, hotels, tour companies, and other amenities were closed, and most public transit was on “off-season” scheduling.
Schedules and weather conditions will vary, so you’ll need to do your research and be ready to be flexible! I loved my shoulder season experience and would wholeheartedly recommend it, just be aware that it comes with a little more planning and uncertainty.
Norway Hiking while Solo
Hiking alone is something that gives many people pause, and was a central part of this trip as I was traveling solo. In general, all of my Norway hiking felt incredibly safe, but it’s still good to take precautions.
For this solo Norway hiking trip, I shared a detailed itinerary with friends and family back home before I left. I also downloaded Google Maps for offline use and used the premium version of Alltrails to allow for offline navigation. Cell service and nature are notorious enemies, so I wanted to have multiple options. On every hike, I brought extra layers, a rain jacket, food, water, basic first aid supplies, and a power bank, knowing that I wouldn’t necessarily be able to rely on someone else if the unexpected happened.
Finally, it’s always good to check in with yourself and modify plans based on comfort level. Some of these hikes were much busier than others (Brekkenfossen, Vidden Route), and some newer solo hikers feel more comfortable when surrounded by others. In addition, I did one of my hikes with a guide (Trolltunga), which is an excellent way to increase comfort level while solo hiking.
Cost of a Norway Hiking trip
There’s no way around it, Norway is expensive. As such, I took a blended budget approach to this trip. At most stops, I stayed in the cheapest accommodation I could find. I also cooked most of my own meals, visiting more grocery stores than restaurants. However, I also chose to splurge along the way, most notably on an overnight Trolltunga hike. For me, this balance allowed me to have a great experience without totally blowing my budget. Since this itinerary focuses on public transportation, you’ll find pricing and duration for the recommended transportation along the route.
From experience, I know that crafting a car-free hiking trip can be daunting. If you’re looking to do the same, you’re in the right place. In the Norway hiking itinerary below, you’ll find my modes of transit, the hikes that I completed, and some other tidbits about my experiences at each stop. Follow along for a 10-day itinerary for one of my favorite hiking vacations I’ve planned so far!
Day 1: Fly into Bergen and catch the ferry to Balestrand
I started my Norway hiking trip with a flight to Bergen. After arriving in Bergen, I caught a same-day ferry to Balestrand. I opted to save my city exploring time for the end of my trip rather than staying in Bergen at the beginning. However, you could absolutely reverse this part of the itinerary.
I booked my ferry through Norled Ferries online, and it admittedly isn’t’ the easiest site to navigate. To find the Balestrand timetables, you’ll look under “expressboat and ferry” for “Vestland (former Sogn og Fjordane)”. You can get to Balestrand via their Bergen-Balestrand-Sogndal route or their Bergen-Balestrand-Sogndal-Fläm route. Make sure to research the specific timetables in advance – the schedules change throughout the week, and this almost caused me to miss my ferry!
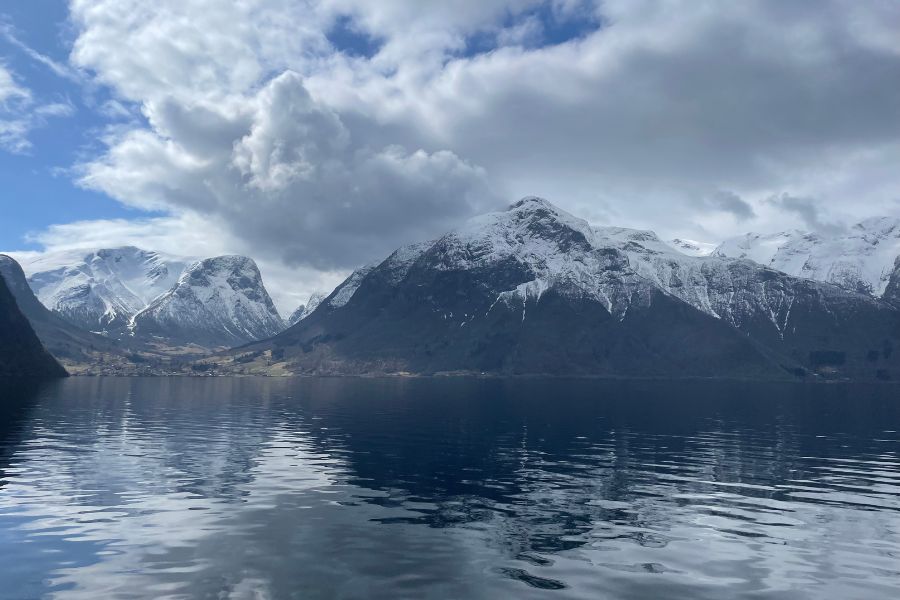
The ferry takes about 4 hours and cost me $80 – like everything in Norway, it was costly. However, this ferry was easily my favorite transit experience in Norway. It was a jaw-dropping intro to the fjords as it wound its way towards Balestrand. As a bonus, the open-top deck meant that I could venture up whenever I wanted a more open view.
Day 2: Raudmelen trail
Exploring Balestrand
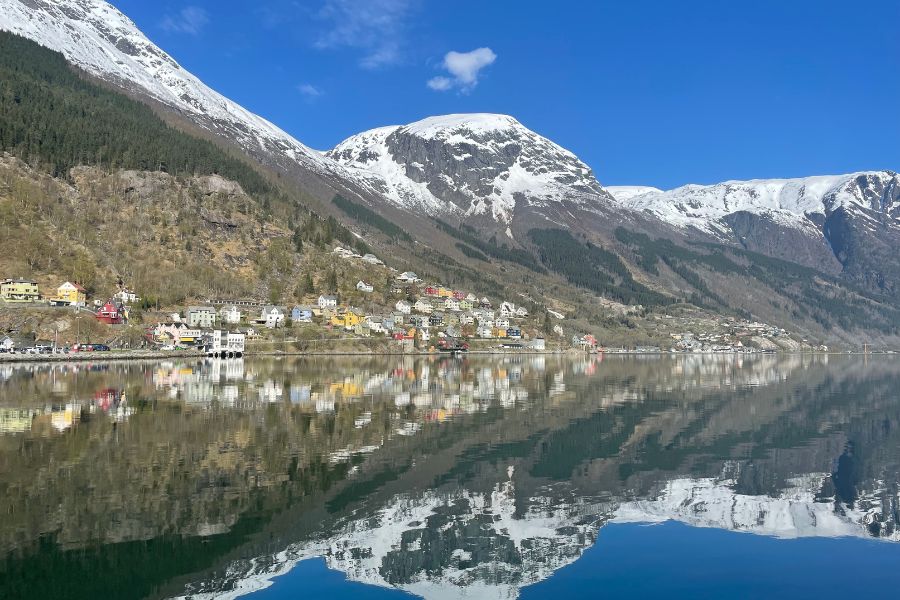
Balestrand is a picturesque tiny town on the edge of the fjords and isn’t on most travelers’ itineraries. Given the lack of budget accommodation in Baldestrand, I stayed in a simple but functional Airbnb. This had the added bonus of allowing me to cook for myself while I was there. Most of the restaurants were closed as it was still off-season and the two grocery stores were closed on Sunday, so plan ahead if you’re also self-catering!
Balestrand is small enough that I didn’t need to use taxis or any other form of transit to get around. I only had one full day in Balestrand, but if you’ve got more time, the tiny town has more to offer! My Airbnb host highly recommended the rib boat tours, and you can also bike around and access some other hiking trails.
Hiking Raudmelen Trail
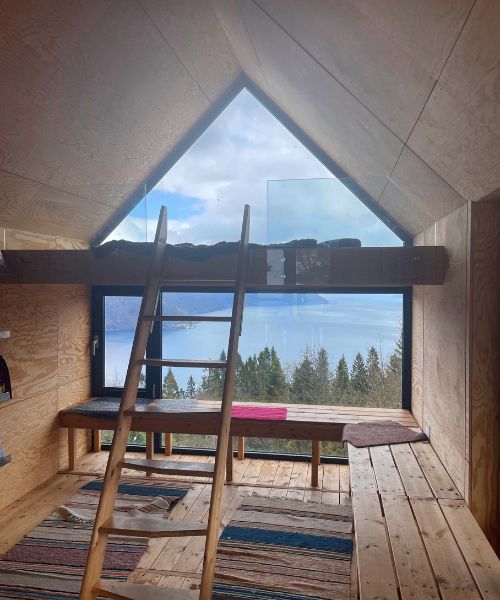
The first trail on my Norway hiking itinerary was the Raudmelen trail. It is a 6-mile hike with a trailhead by the local school, which is easily accessible by foot. Given the shoulder season timing, the trail was quite snowy and it even snowed during part of the hike. While I didn’t make it to the top, it was still a wonderful hike with breathtaking views.
Partway up, you’ll find a beautiful hut complete with a wood-burning stove. If you bring sleeping gear and food (and the hut is unoccupied), you can stay overnight in this picturesque hut for free! Even if you’re not planning to spend the night, it’s worth a peek inside! There’s another hut at the top of the hike as well, if you make it that far. Further up, I also found a rack with snowshoes for hikers to borrow and return on the way down. The snowshoes and huts added a distinct charm to the Norway hiking experience which set a great tone for the trip.
Day 3: Catch the ferry to Fläm
The Balestrand-Fläm ferry was only operational once per day during the period when I was there. So, after my second night in Balestrand, I hopped on for the hour-and-a-half ride, which cost me about $30. Again, a gorgeous journey, and our boat operator even turned it into a bit of a sightseeing tour for us! He navigated us into particularly scenic fjords and motored up to waterfalls just so we could appreciate the views. While on the ferries, don’t miss the chance to grab a traditional waffle with jam from the snack area!
In Fläm, I stayed in a private room at the Fläm Camping and Hostel. This was the cheapest spot I could find in town, and it worked great for my short stay. Though it is a bit outside of the town center, it is still easily walkable from the ferry terminal. Once again, I took advantage of the communal kitchen given the price of eating out in Norway. After checking in, I grabbed a waffle from a cafe and bought a Fläm railway ticket for Day 5. These tickets sometimes sell out, so it’s worth thinking ahead rather than waiting until the last minute.
Day 4: Brekkenfossen waterfall hike
Brekkefossen is the most popular hike in Fläm, so of course I had to give it a go. It’s a short (~3.5-mile) but steep trek up to a waterfall overlook. Along the way, you’ll see stunning views over the town of Fläm and its fjord. It is easy to get to the trailhead by foot from the town’s center, and it just so happened that my hostel was right on the way. It was a crowded but beautiful hike, well worth the heart-pumping grade.
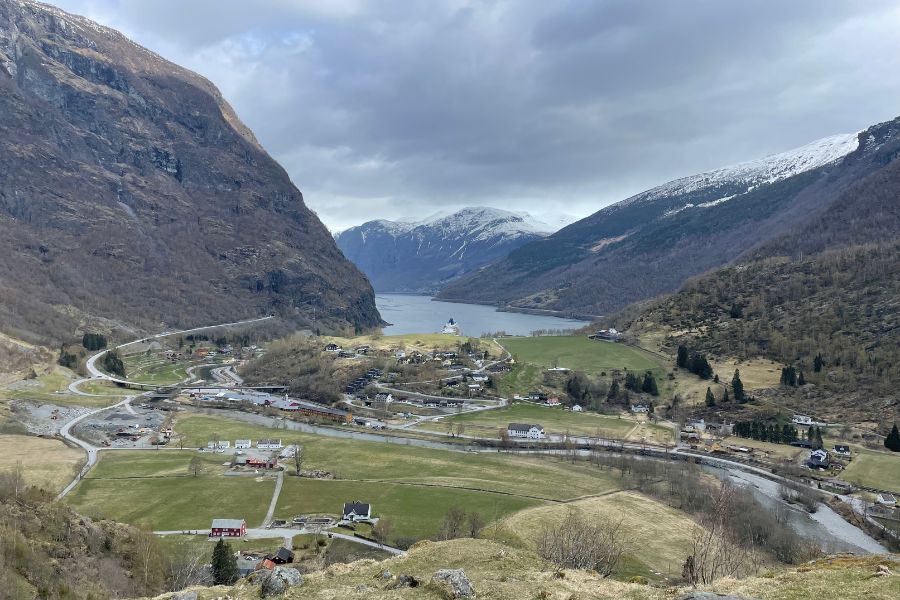
After coming from peaceful Balestrand where I was one of a handful of tourists, Fläm felt a bit overwhelming. A massive cruise ship docked while I was there, and the impact was palpable. I didn’t feel as though I needed a second full day in Fläm, but there are always more things to see if you’ve got time and budget! Two popular options include taking a bus from central Fläm to the Stegastein viewpoint or taking a sightseeing ferry to Gudavangen, which takes you through a very narrow fjord.
Day 5: Ride the train + bus to Odda
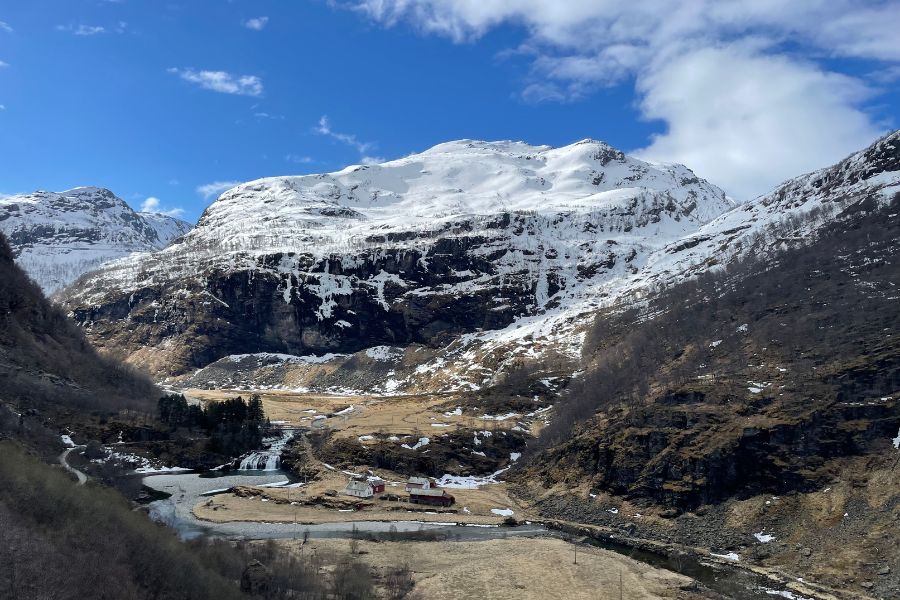
Fläm Rail
A big part of the reason I went to Fläm in the first place was to ride the Fläm rail. The Fläm rail is a very steep 20 km stretch of rail between Fläm and Myrdal which offers incredible nature views. I love train journeys (and of course love a good window seat view), so I knew my Norway hiking itinerary wouldn’t be complete without this experience. The journey was gorgeous, though when it made a stop at a supposedly massive waterfall, we were a bit disappointed to discover that it was completely frozen over.
I took the train from Fläm to Myrdal, then connected to another train at Myrdal which took me to Voss. In total, my trains from Fläm to Voss cost around $50 and took around 2 hours. I used the VY website to check timetables, and on the website, you’ll notice that you can also take a bus from Fläm to Voss for about half the cost and half the time. I love trains and wanted the Fläm Rail experience, so for me, the train was absolutely worth it. However, if you’re just looking for an efficient way to get to Voss, the bus is probably your best bet.
Bus to Odda
>> If you want more details about making the most of your time in Odda, I’ve also written a full post on things to do and see in Odda!
From Voss, I caught the 990 Skyss bus to Odda. Skyss operates all of the main buses in this area of Norway, which makes planning very convenient. The buses are priced via the zone system which keeps things simple and relatively affordable. You can purchase tickets on the Skyss app, which I would recommend. I never purchased/reserved my tickets far in advance – I just hopped on the app a few minutes before my departure. I never had a problem as long as I showed up to my bus a bit early. My ticket to Odda cost around $7 for the two-hour bus ride.
In Odda, I stayed at the Trolltunga Hotel, as the prices were reasonable and they offered transportation for my main activity near Odda, the Trolltunga hike. However, Trolltunga Hotel is up a long, steep hill which I did not want to trek up with bags. Luckily, I was able to catch a bus from the Odda station up to the top of the hill (~$4). However, the timetable on this bus was far from regular, so some patience at the station may be in order.
Day 6: Bondhusdalen hike
The next day, I headed back down to the Odda bus station to catch the 760 bus to Bondhus. This 30-minute bus ride cost ~$4 and ran every hour or two. Once arriving in Bondhus, it was a short walk to the Bondhusdalen hike trailhead.
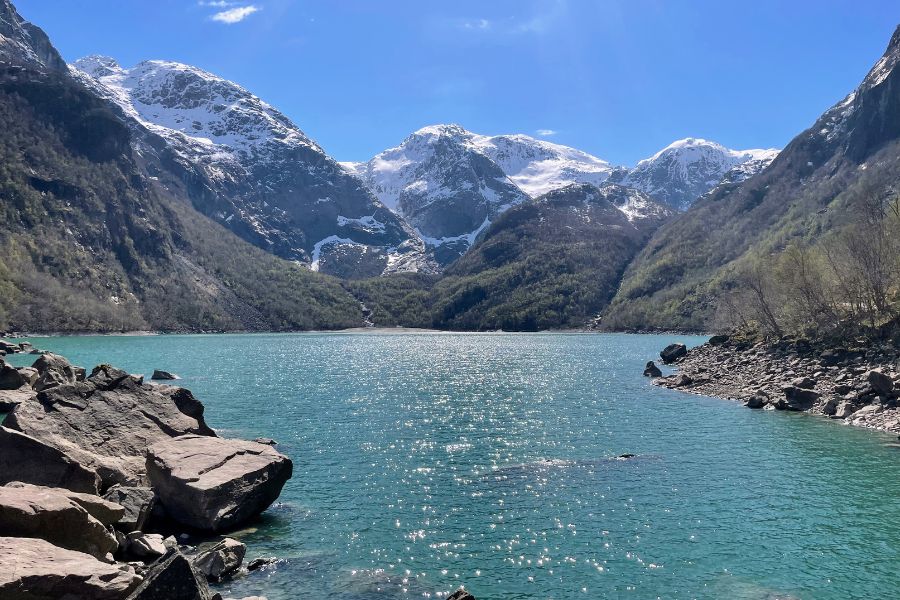
Compared to my previous hikes, this one was a bit longer at ~6 miles, but much more mild. A gentle incline leads up to a gorgeous turquoise lake framed by snow-capped mountains. If you continue hiking around the lake (which I did), you’ll find a massive waterfall as well. I made an effort to get to this trail on the early side and was glad I did. When I arrived there were only a few cars in the parking lot and I got to hike in relative solitude. However, by the time I hiked out, the lot was full.
One thing I noticed during much of my Norway hiking was that being “early” was fairly easy. In the US, getting to a trailhead “early” could mean 5 am, which feels extreme. In Norway, as long as I was hiking by 9 am, I usually felt ahead of the crowd.
I still had a bit of daylight left when I got back from Bondhusdalen, so I decided to go for a polar plunge. The Trolltunga Hotel is right next to a picturesque lake, which was an opportunity I couldn’t pass up. It was 30 degrees outside and the water wasn’t much warmer, but the adrenaline rush was well worth it.
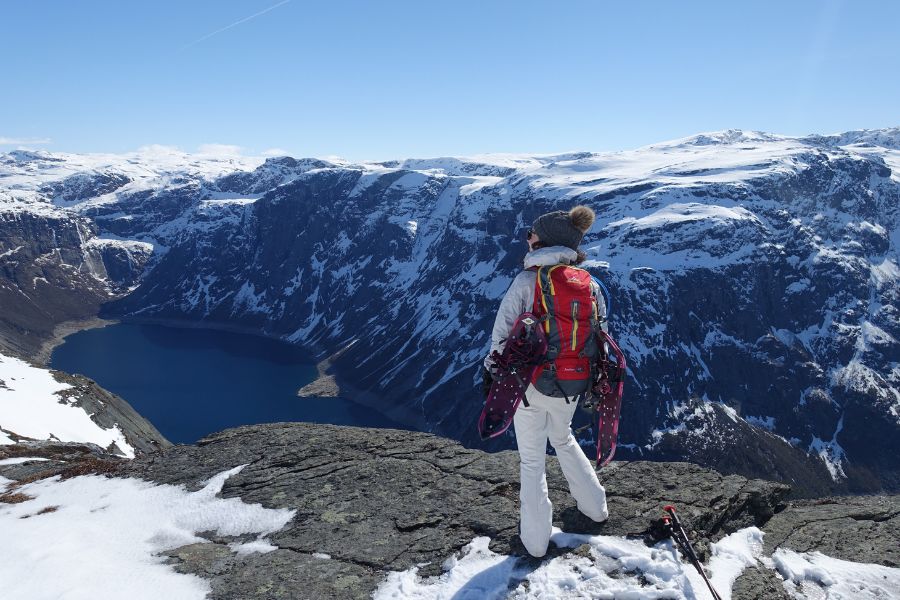
Day 7: Trolltunga overnight hike
Bright and early on Day 7, I embarked on the pinnacle of my Norway hiking bucket list: a two-day Trolltunga Sunrise/Sunset Winter hike with Trolltunga Active. This was NOT a budget-friendly activity, clocking in at almost $500 including a backpack rental. This was my splurge of my Norway hiking experience, and it could not have been more worth it.
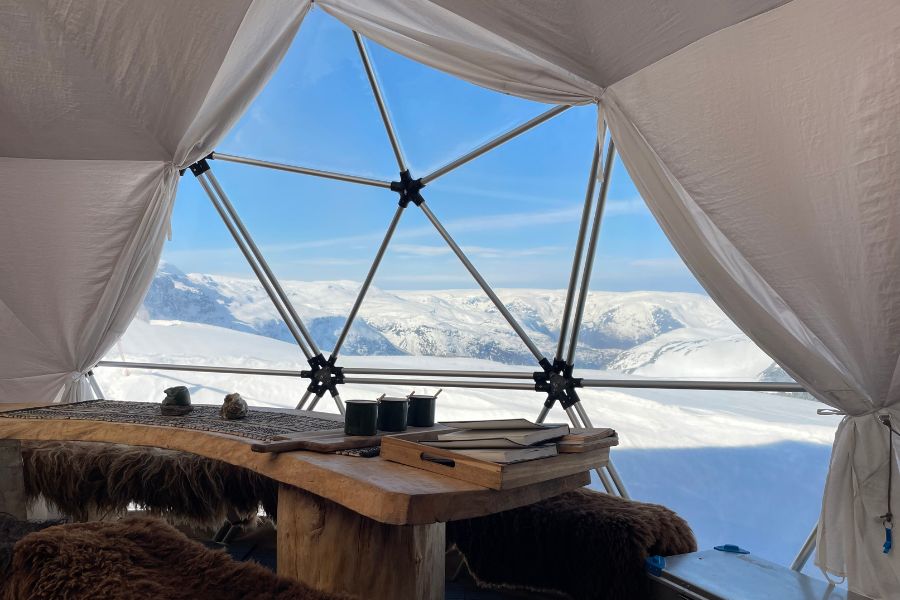
The hike is around 16 miles out and back, depending on which parking lot you start at. Some people hike it in one day, which is attainable as long as you’re fit and the conditions are good. However, on the overnight version I chose, you get to spend the night in a cozy glamping dome out in the mountains. This means that you are treated to utter solitude in a fantastic landscape, which is an absolute treat. I cannot say enough good things about my experience and I’m so glad that I splurged. In fact, I wrote an in-depth review of my overnight Trolltunga hike experience, so check it out if you’re curious about taking the plunge!
A few things to keep in mind if you’re hiking Trolltunga during the shoulder season:
- The “troll tongue” itself where folks like to pose for photos is inaccessible for much of the winter due to snow and ice which make it incredibly hazardous to access. On my hike, we did not go out on the rock but rather stayed on solid (safe) ground. We still took some incredible pictures and it was not a dealbreaker for me by any means. However, if you’re doing the hike with the primary goal of getting a classic Trolltunga picture, shoulder season is not for you.
- Transportation during off season can be dicey. During high season, there are shuttles that run from central Odda to the trailhead, and shuttles that run from the lower parking lots of the trailhead up to the upper parking lots, significantly shortening your hike. In the off-season, there are no shuttles from Odda or from the parking lots. Even if you have a car, you can only access the lower parking lots – the upper ones are locked. We met folks who started at the lower parking lots and had to hike several extra miles of steep, concrete switchbacks before even getting to the main trail. The guided hikes avoid this conundrum as they have access to higher lots, and will even ferry you as far as they can go on the snowy roads with all-terrain vehicles in order to cut down on the road walking.
Day 8: Return from Trolltunga & catch the bus to Bergen
After returning from my Trolltunga hike, I picked up my luggage that I had stashed at the hotel. Then, I headed back to the Odda bus station and caught the evening 930 Skyss bus to Bergen. This ticket cost ~$11 for a 3-hour journey, and brought me straight into downtown Bergen. Here, I was able to catch a city bus (~$4) to my hostel for the night: HI Bergen Hostel Montana. This hostel is a bit outside of the city center (hence the bus) but offers cheap prices and lovely views.
Day 9: Hike the Vidden Route
My final Norway hiking target was the Vidden Route, an 8-ish mile one-way hike that you can easily access via public transit. This route starts a bit outside of the city at Mt. Ulriken, which is near the hostel I stayed at and easily accessible via public bus, and ends near the city center at Mt, Fløyen.
I started the route with a cable car ride up to the top of Mt. Ulriken, which costs ~$22. If you’re balking at the price, you can choose to hike to the top of Mt. Ulriken instead, just be aware that it’ll add some additional distance and elevation to your hike. From the top of Mt. Ulriken, you wind your way through beautiful landscapes all the way to Mt. Fløyen, where you can choose to either ride the funicular down or walk. I walked to save some money, and explore a bit more. However, if your legs are tired by the end, you have an easy way out!
After spending the rest of my trip in smaller towns, the bustling nature of this hike was a bit of a shock. Trail runners were abundant, and there was a constant flow of people. However, this means that if you’re a bit less comfortable with solo hiking, this is a great starter hike for you as you’ll never truly be alone!
Day 10: Fly out of Bergen
If you have a bit of extra time in Bergen after all of your Norway hiking, you can check out the fish market, wander the picturesque Bryggen neighborhood, and check out some typical Norwegian cuisine, such as fiskekaker (fish cakes). After soaking in the charm of Bergen, it’s time to head home. There’s a fantastic light rail that takes you from the city center to the Bergen airport for ~$4, which rounds out the public transportation experience swimmingly.
With this Norway hiking itinerary, you get to try 5 hikes in 4 different towns over the course of 10 days, with no car rental or private driver needed! I absolutely loved my time in Norway and was blown away by the stellar views, abundant rainbows, quiet solitude, and ease of navigation via public transportation. Whether you’re looking to ease into solo travel and solo hiking or you’re an experienced traveler looking for your next destination, Norway is a fantastic place to explore!
Pingback: The Epic Trolltunga Overnight Hike: A Complete Review
Pingback: How To Pick Solo Travel Destinations: My Time-Tested System
Pingback: Visiting Odda, Norway: Seven Unique Things to Do and See